Website Internationalization (i18n): The Ultimate Guide
As a company with global ambitions, expanding into new markets is a vital step. And an expansion will likely require a localized website that fits your target market. But before you can even translate your website’s content, you must first internationalize it.
2022-12-02
- What is internationalization (i18n)?
- Why should you localize your website?
- Is your website internationalized?
- Internationalization requirements.
- Project configuration
- Backend setup.
- Replace hard-coded strings.
- Generate translation files.
- Translate your strings.
- Add a language selector.
- Updating translatable strings.
- Add more locales to your website.

1.What is website internationalization (i18n)?
2. Why should you localize your website?
By localizing your website, you adapt it to your new customers’ cultural and linguistic preferences. You can’t expect that a website designed for Chinese customers will be user-friendly to American customers.
Not only is their language different, but their browsing habits are also different. It’s not based on our experience alone; in fact, consider the following statistics:
- 87% of consumers don’t buy anything from a website in another language.
- 65% of consumers prefer to read a website in their native language.
- Visitors stay twice as long on a localized website.
- 64% of buyers value localized content.
In fact, of all the investments you can make, improving your customers’ user experience provides the highest returns. According to WebFX, every dollar invested in UX provided a $100 return. That’s an ROI of 9,900%!
But, before you can localize your website, you must first deal with website internationalization.
3. Is your website internationalized?
Before jumping into website internationalization, a quick check is essential. After all, your website could already be ready for the localization process, but you’re unaware of it.
Here are some key pointers that can guide you:
- If it contains hard-coded strings, then it isn’t internationalized.
Hard-coded strings are words embedded inside the code, like the example below.
					<div class=”ui-section-hero–content”>
<h1>Design better.</h1>
<p class=”ui-text-intro”>
Design Mobile UI faster and better with our product and produce
professional designs for your business
</p><div class=”ui-component-cta ui-layout-flex”>
<form action=”#” class=”ui-component-form ui-layout-grid ui-layout-column-4″>
<input type=”email” placeholder=”Email”
class=”ui-component-input ui-component-input-medium” required>
<button type=”submit”
class=”ui-component-button ui-component-button-medium ui-component-button-primary”>
Join Waitlist
</button>
</form>
<p class=”ui-text-note”><small>Available on Android and iOS.</small></p>
<p class=”ui-text-free”>Free for 3 months
</p></div>
</div>
Hard-coded strings
- It is not internationalized if it doesn’t support right-to-left languages, such as Arabic and Hebrew.


- It is not internationalized if it only supports one time zone, number, and currency format.
- It is not internationalized if it has no functionality to switch between languages/locales.
- It is not internationalized if it is not Unicode compliant.
Unicode Standard is a character coding system designed to support the worldwide processing, interchange, and display of the texts of diverse languages and technical disciplines of the world. Moreover, it supports historical and classical texts of many written languages. It also provides the solution for internationalization and the architecture to support localization.
Knowing all the above, let’s see how we can start the website internationalization process.
4. Website Internationalization requirements
Before we delve into the specific steps, you will need some basic tools to get this done. We used PyCharm IDE for this project, but it is not compulsory. We also used Python 3.10 for this demonstration, you can download it here. You can refer to this link for a detailed walkthrough of Python’s installation.
We will also use these two:
- Flask-Babel is a library that implements i18n and l10n support for Flask (Python) Web Applications.
- Flask is a lightweight web framework for Python.
Although coding skills aren’t an absolute requirement, they are definitely recommended. Otherwise, we encourage you to have a learner’s mindset since it will help you push through some challenging steps.
You may either build a sample website from scratch, use your existing website, or clone our GitHub repository. You can use it to follow the internationalization steps from this article.
To clone our repository, run this command.
git clone https://github.com/Transphere-Sunyu/i18n-python.git
5. Project configuration
First, create an i18n-python folder and the following three folders (inside it): static, locales, and templates, together with an app.py file in the root directory.
For UNIX/Linux operating system.
Plaintext
mkdir i18n-python && cd i18n-python
mkdir static locales templates && touch app.py
For Windows operating system.
					mkdir i18n-python && cd i18n-python
mkdir static locales templates && type nul > app.py
Create a Virtual Environment where all the packages will be installed. This is automatically created if you are using Pycharm.
					pip install virtualenv
python -m venv ./venv
Activate the Virtual Environment.
					Shell
source venv/bin/activate
Run the command below in your terminal pointing to your project folder path to install Flask and Flask-Babel into the project.
pip3 install Flask_Babel Flask
Create a babel.cfg file to let Babel know where to look for translations and add the following.
					[python: **.py]
[jinja2: **/templates/**.html]
The first two lines define the filename patterns for Python and Jinja2 template files, respectively. Jinja2 is an extensible templating engine that allows code similar to Python syntax to be used. It relies on data passed to it to generate the final document. The project folder structure should resemble the one below.

6. Backend setup
In your app.py, import the following modules at the top of the file.
					from flask import Flask, render_template, request, session
from flask_babel import Babel
import os
Add the following code to the same file.
					app = Flask(__name__)babel = Babel(app)app.config[‘BABEL_DEFAULT_LOCALE’] = ‘en’
app.config[‘LANGUAGES’] = {
‘en’: ‘English’,
‘zh’: ‘Chinese(Simplified)’,
‘ar’: ‘Arabic’
}

app.config[‘SECRET_KEY’] = ‘your secret key’

app.config[“BABEL_TRANSLATION_DIRECTORIES”] = os.path.abspath(‘locales/’)

# Make languages and current_languages variables
# accessible in all the templates
@app.context_processor
def inject_conf_var():
return dict(languages=app.config[‘LANGUAGES’],
current_language=session.get(‘lang’,
request.accept_languages.best_match(app.config[‘LANGUAGES’].keys())))

@babel.localeselector
def get_locale():
if request.args.get(‘lang’):
session[‘lang’] = request.args.get(‘lang’)

return session.get(‘lang’, request.accept_languages.best_match(app.config[‘LANGUAGES’].keys()))

@app.route(‘/’)
def index():
get_locale()
return render_template(‘index.html’)

if __name__ == ‘__main__’:
app.run()
Make sure to replace “BABEL_TRANSLATION_DIRECTORIES” with the path to your translation folder.
@app.context_processor basically makes the language and current_language variables available to every template in the form of a dictionary, as seen below in the web application.
					{
‘languages’: {‘en’: ‘English’,
‘zh’: ‘Chinese(Simplified)’},
‘current_language’: ‘en’
}
7. Replace hard-coded strings
Wrap the strings (texts to be translated) in the HTML file in parentheses with the _() text marker to tell Flask-Babel which strings you want to translate, i.e., {{ _(‘HTML string!’) }}. Do this for all the strings, and the result will look like this:
					<div class=”ui-section-hero–content”>
<h1>{{ _(‘Design better.’) }}</h1>
<p class=”ui-text-intro”>
{{ _(‘Design Mobile UI faster and better with our
product and produce professional designs for your
business’) }}
</p>
</div>
8. Generate translation files
Run the following commands below to extract the strings from the HTML file in the template folder.
pybabel extract -F babel.cfg -o messages.pot .
You should be able to see the following logs after running the command if you are using the code from our repository.
					extracting messages from app.py
extracting messages from templates\index.html
The pybabel extract command reads the configuration file given in the -F option, then scans all the files in the directories that match the configured sources. By default, PyBabel looks for _() as a text marker. The -o option indicates the name of the output .pot file.
You should be able to see the following logs after running the command if you are using the code from our repository.
pybabel init -i messages.pot -d locales -l zh
The pybabel init command uses the messages.pot file and writes a new language catalog to the directory given in the -d option (locales) for the language specified (zh) in the -l option, and it generates a translation.po file as seen below.
					#: templates/index.html:62 templates/next.html:62
msgid “Design better.”
msgstr “”#: templates/index.html:63 templates/next.html:63
msgid “”
“Design Mobile UI faster and better with our product and produce “
“professional designs for your business”
msgstr “”
msgid contains the base language strings, while msgstr contains the target language strings.
Now that the website internationalization process is almost complete, we can start translating.
9. Translate your strings
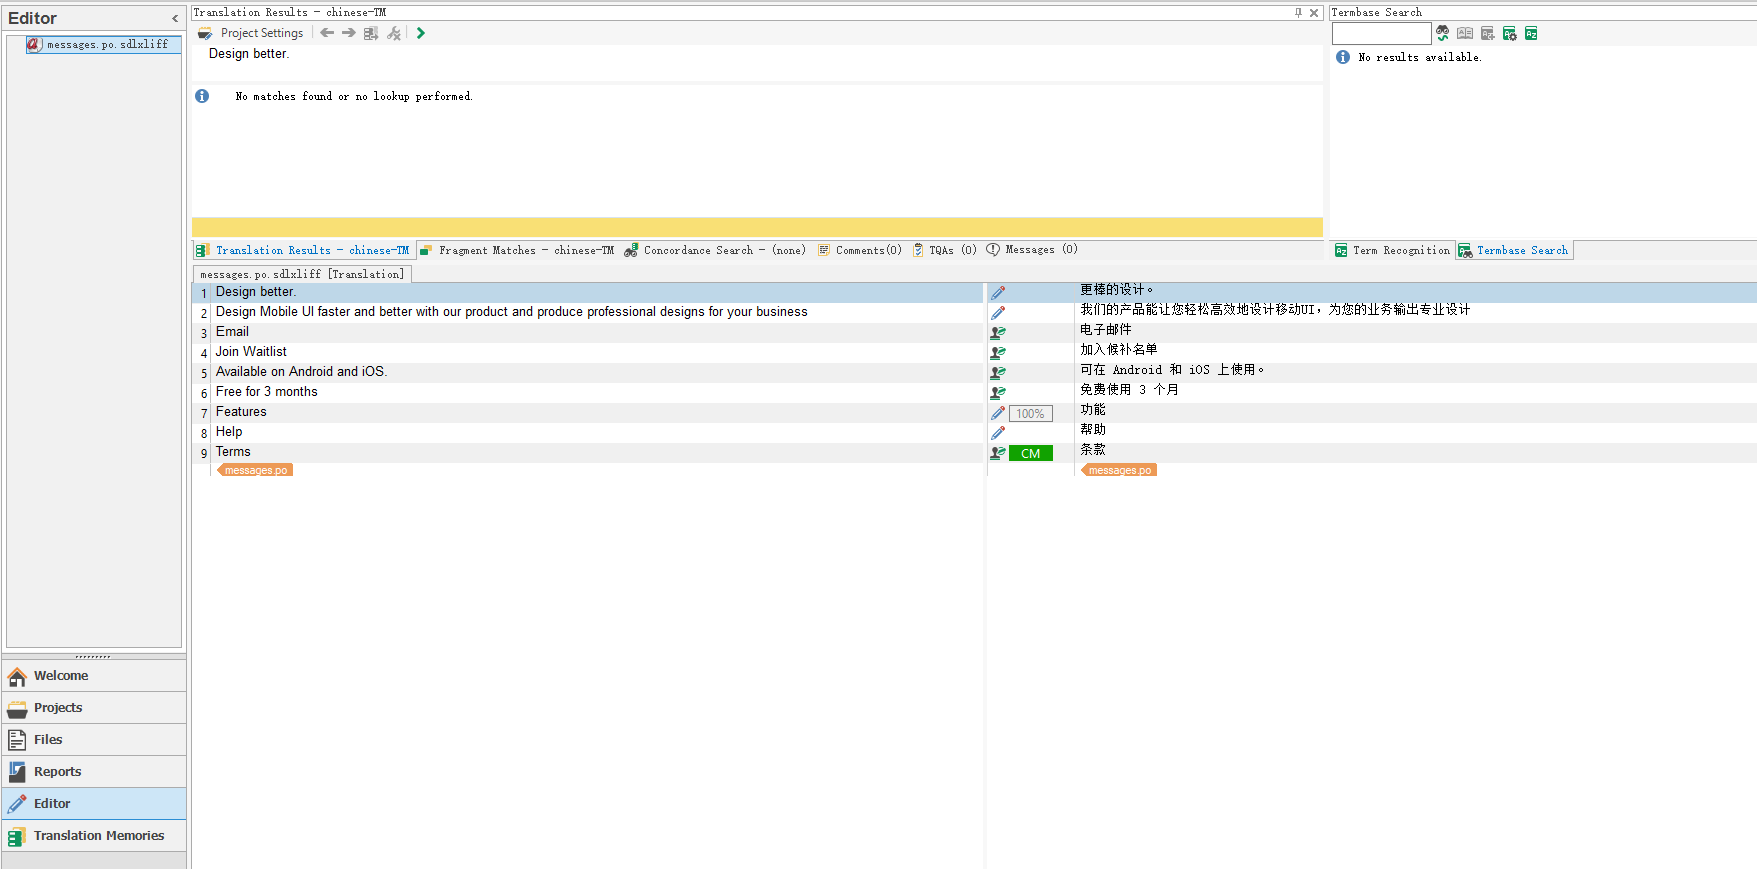
Translation strings should be added to msgstr in the messages.po file and would resemble the snippet below.
					#: templates/index.html:71 templates/next.html:71
msgid “Available on Android and iOS.”
msgstr “可在 Android 和 iOS 上使用。”#: templates/index.html:86 templates/next.html:86
msgid “Features”
msgstr “特点”
We will not add translation strings individually because that’s time-consuming and inefficient.
Instead, we will use Trados Studio to translate our source strings to our target language.
Feel free to pick an alternative Translation Management System. This step is pretty simple:
- Create and set up a project.
- Add your source file (messages.po in our case).
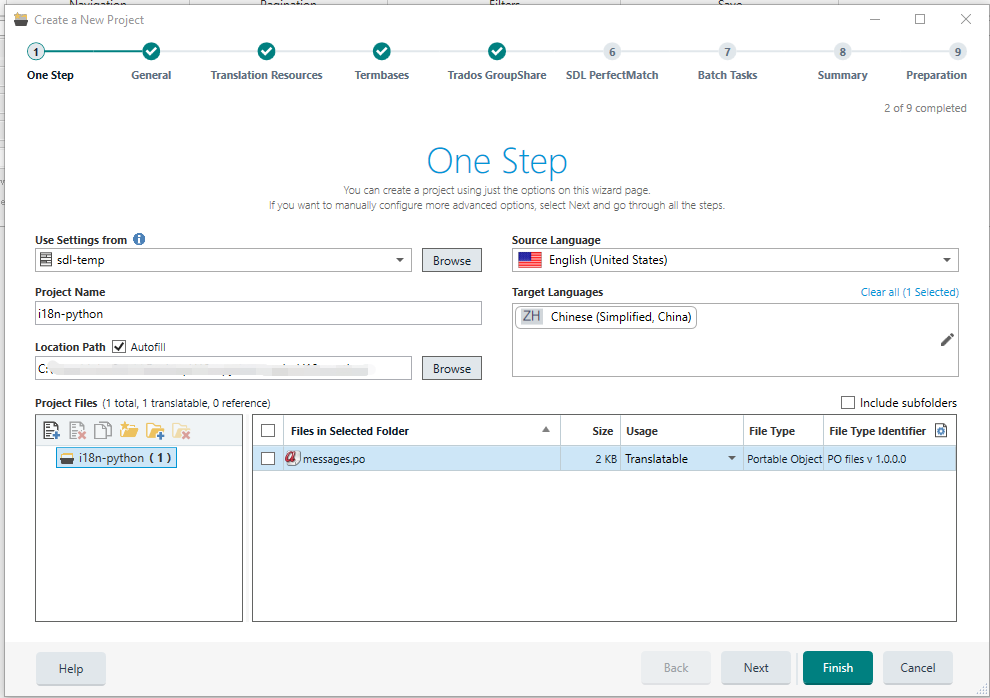
Translate your strings, and once they are approved, export the target language file back to your locales folder.
In our case, that’s locales/zh/LC_MESSAGES.
Once you complete all the translations, you can input the command below. It compiles the translation files in the locales folder to .mo files.
These files are the ones that Flask-Babel will use to load the translations for your website.
10. Add a language selector.
Add a language selector for users to select their preferred language.
Add the following Bootstrap CDN code at the bottom of your body tag.
					<script src=”https://cdn.jsdelivr.net/npm/bootstrap@5.2.1/dist/js/bootstrap.bundle.min.js”
integrity=”sha384-u1OknCvxWvY5kfmNBILK2hRnQC3Pr17a+RTT6rIHI7NnikvbZlHgTPOOmMi466C8″
crossorigin=”anonymous”></script>
<script src=”https://cdn.jsdelivr.net/npm/@popperjs/core@2.11.6/dist/umd/popper.min.js”
integrity=”sha384-oBqDVmMz9ATKxIep9tiCxS/Z9fNfEXiDAYTujMAeBAsjFuCZSmKbSSUnQlmh/jp3″
crossorigin=”anonymous”></script>
And add this one to the header tag.
<link href=”https://cdn.jsdelivr.net/npm/bootstrap@5.2.1/dist/css/bootstrap.min.css” rel=”stylesheet” integrity=”sha384-iYQeCzEYFbKjA/T2uDLTpkwGzCiq6soy8tYaI1GyVh/UjpbCx/TYkiZhlZB6+fzT” crossorigin=”anonymous”>
And add this one to the header tag.
					<!– MENU –>
<div class=”dropdown”>
<button class=”btn btn-secondary dropdown-toggle” type=”button” data-bs-toggle=”dropdown” aria-expanded=”false”>
{{ current_language }}
</button>
<ul class=”dropdown-menu”>
{% for language in languages.items() %}
<li><a class=”dropdown-item” href=”{{url_for(‘index’,lang=language[0]) }}”>
{{ language[1] }}</a></li>
{% endfor %}</ul>
</div>
The current_language and language variables are accessible in the HTML file due to the @app.context_processor decorator, which was mentioned above.
.items() method returns the languages as tuples in a list, and they are looped through to get the list of languages that are displayed as a dropdown list.
To view the website on your browser and switch between the languages, run the command below in the terminal.
flask run
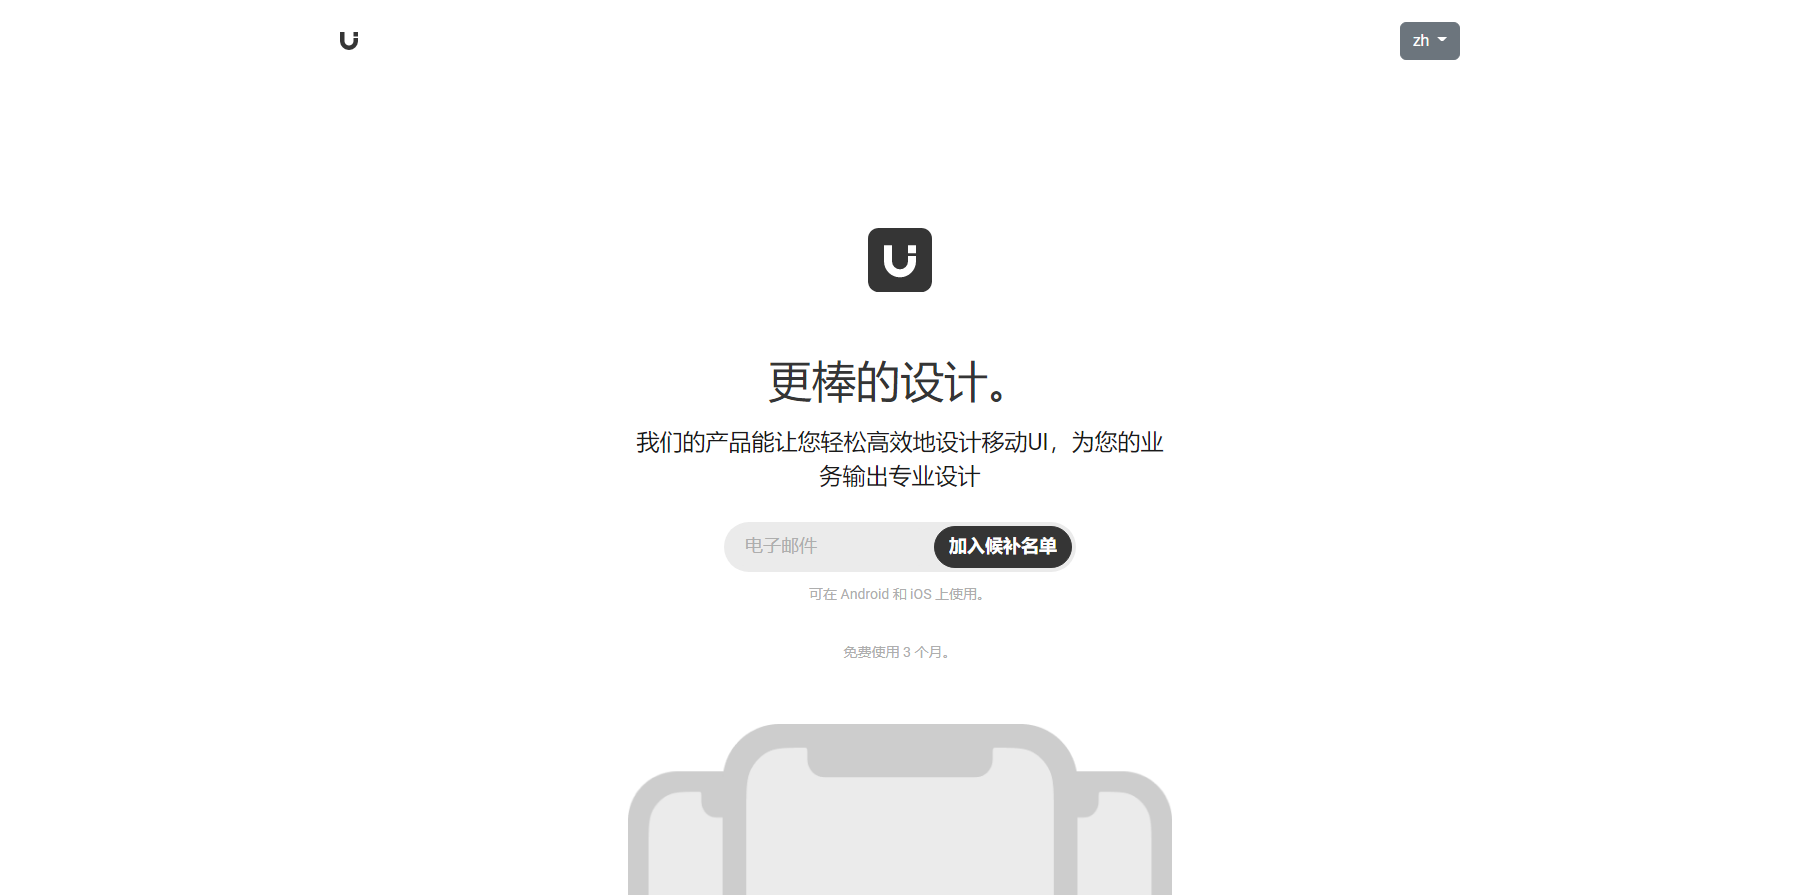
Below are some screenshots of the translated webpage into Simplified Chinese (zh).

11. Updating translatable strings
Suppose you want to add new text to your website’s pages. How would you go about it? You would just need to follow Step 7 in the HTML file.
Add a paragraph tag to your index.html with a new translatable string.
<p class=”ui-text-intro”>{{ _(‘Free for 3 months’) }}</p>
Run the extract command to extract the translatable strings.
pybabel extract -F babel.cfg -o messages.pot .
Notice that the messages.pot file has been updated with the new translatable string.
Next, run the update command, which will update the message.po file.
pybabel update -i messages.pot -d locales
Translate the new string and finally run the compile command.
pybabel compile -d locales
12. Add more locales to your website
You’re finally done with your website internationalization process.
With the groundwork taken care of, you can now start the localization process. For this part, we’d encourage you to hire trusted localization professionals.
Once they complete the translation, all you need to do is update your locales folder with new locales.